
One of the struggles with kiddos is finding a place to successfully store all their toys and maintain a semblance of a nicely decorated home. Even if you have a playroom, toys still end up in random places… my bathroom, my bed, the kitchen, even the laundry room. But we all do our best to centrally place the belongings but we didn’t actually have a designated spot for a playroom and we needed one.
 Our house is a single story, 4-bedroom space with one of the bedrooms right next to our master. For our first baby, that room was the ideal setup for a nursery. With all the new mom worries, it helped she was close by. As she got older and toys started taking over the house, as kid’s stuff does, we wanted to switch up the rooms and make her nursery into the playroom.
As we took the nursery apart piece by piece, it was a little sad. It truly does show how fast my baby has grown and time will continue to march on even though I don’t want it to. I loved her navy room, even though I had many people give me strange looks when I mentioned the color I had chosen to decorate my little girl’s room. But I think the dark paint may have helped her nap during the day. I was sad to paint the room such a boring color after that. Since the window to the playroom is connected to a covered porch, it keeps the room shaded and for playtime we wanted something brighter, so it was the right choice to change the color.
 With baseboards scrubbed white again and the room painted the original beige color, I set my attention to IKEA’s website. I started with their website first because I find myself easily distracted when I go in the store. After all, they just have so many things I just want to own! Creating my shopping list online helps keep me focused and on budget for when we get to the store.
I had a goal that I didn’t just want a play room where toys could be dropped and left. I wanted to set up an organization to the mess. I can handle mess as long as it’s organized. I am notorious for having stacks of paper in my office or on the back counter in my kitchen, but I pretty much know what is in the stack and where it was last… as long as no one touches it! We had considered doing custom built in bookshelves in this room, but we didn’t want to spend that much time or money.
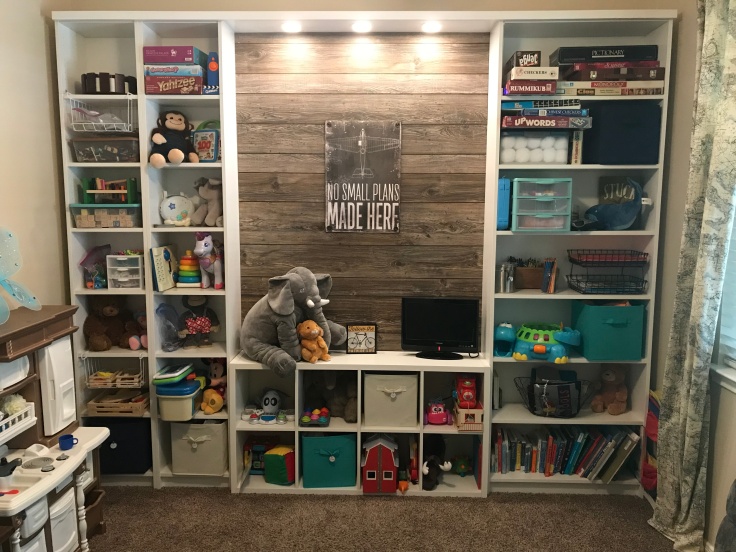
 The Billy Bookcases and the Khallax Bookcases from IKEA seemed to be the most popular bookcase hacks on Pinterest. But the Khallax cases were too big for our small bedroom that we were flipping. Not only that, the Billy Bookcases had the most popular hack to make a room appear to have built ins. So…I measured the room to know exactly how much wall space I needed to cover. I sketched, I calculated, and I formulated a plan for what we needed to organize the space to make it most functional.
In the end I had just under 10 feet in length of wall space to work with. We bought…
1 – Billy Bookcase – 31″ x 93″
2 – Billy Bookcases – 15″ x 93″
I went back and forth on the narrow Billy Bookcases because I loved the idea of the cubical system. It offers the clean line look and I could designate a cubie for a specific type of toy. But I also like the traditional bookcase too, because it allowed me to use it for larger items like the bouncy ball dinosaur toy that wouldn’t fit in a cubie. Doing the mixture of the two structures allowed me to have the best of both worlds.
 To finish the look, we attached a long 1×12 board up top and put a 1×2 across the front of it to finish the look. Then we placed under-cabinet-lighting underneath the shelf to add extra light in the room.
To cover the blank wall space between the vertical shelves, we built a frame out of 1×4 and 1×2 boards. This frame would hold the thin sheet of faux shiplap we were using as our decorative wall piece. The frame also covered any gaps we would have due to the baseboards causing any gaps between the units and wall and it gave it a more finished look. We then added some extra 1×4 boards for bracing in case we ever decide to put a tv up there. After cutting the particle board to size we nailed the faux shiplap into place.
We like to build things that can be multi purposed and this is one of those spaces. As the family grows and the toys change from stuffed animals and play food, to board games and video games we are able to transition whenever the time comes.
Overall I think our flip cost us roughly $700 and that includes the paint, shelves, and accessories like the rug, lights, shelf hangers and a few baskets for loose items like paper. It also took us two weeks to pull it all together, but our whole family was fighting a virus during that time, so I think it could have been finished in a long weekend.
 After all that, it was time to put everything back. Even though I lost my colored walls, I was surprised how having the toys on display added it’s own touch of color. The morning we took our daughter into the finished playroom her eyes sparkled with excitement. It was like she actually got to see all the toys she owned and she was slightly overwhelmed… and I am too.
Her transition playroom only had an 8 cubical organization system and it grew to approximately 36 cubical organization space. I thought I’d have empty spaces, but we filled them all! Needless to say, she doesn’t need any toys for a while. I find that she likes playing in here for the moment (haha) not only because it’s new but because it’s like she is rediscovering her toys again.
I hope I covered everything and if you have questions about our flip, don’t hesitate to leave a comment and I’ll get back to you ASAP. We enjoy sharing our projects and hope it inspires you as well.

Leave a comment